What is clubfoot?
Clubfoot is a malformation of the foot that is present at birth. The malformation can affect one foot or both feet.
Treatment for this condition begins early after birth using the Ponseti method of serial casting. Once full correction is achieved, your child will be prescribed an orthosis (brace) to maintain the foot or feet in the corrected position. Proper compliance with the brace reduces the risk of the clubfoot recurring.
Why are the boots and bar so important?
It is important your child wears the boots and bar orthosis as prescribed. Failure to use the boots and bar as prescribed can lead to a recurrence of the clubfoot deformity.
- 90% of children have a recurrence if they stop wearing their brace in the 1st year
- 70% to 80% of children have a recurrence if they stop wearing their brace in the 2nd year
- 30% to 40% of children have a recurrence if they stop wearing their brace in the 3rd year
- 10% to 15% of children have a recurrence if they stop wearing their brace in the 4th year
- Only 6% of children have a recurrence if they stop wearing their brace at age 5 or older.
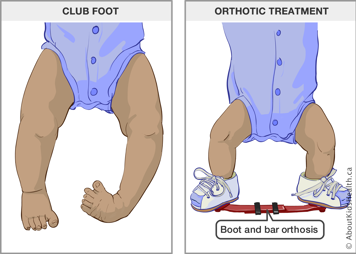
The boots and bar orthosis
After full correction of the feet/foot has been achieved, your physical therapist will prescribe boots and bar (also called a foot abduction orthosis). The orthosis is two open-toed leather boots connected by a metal bar. The brace holds your child's feet turned outwards in the corrected position. Your therapist will determine the degree of outward rotation at which the feet will be held in the brace.
How are the boots fit?
A team member will fit the boots on the first day, show you how to put them on and mark the holes on the straps for the best fit. The fit may change in the first few days and you will likely need to make the straps tighter as swelling decreases and the leather stretches out. It is very important that your child's foot does not move within the boot.
The bar is set to shoulder width, and the boots are set at a specific angle of rotation on the bar. Only a team member should adjust this.
Step by step guide on using the brace
- Make sure your child’s socks or stockinette are well fitted. Ideally, they fit snug with no wrinkles, are thin and single-layered and have no design on them so they do not leave imprints on the foot. Open-toed socks are recommended when new boots are fitted to allow for circulation checks.
- Open the boot all the way so the straps and buckles are clear for inserting the foot. Buckles should be on the INSIDE of the foot.
-
Holding the lower leg, gently slide the foot into the brace, heel first so that it sits against the bottom and back of the boot. If you are having trouble making sure the heel stays down, then bend the knee and flex the ankle upwards before inserting the foot into the boot.


-
While making sure the heel is down, pull the tongue horizontally against the top of the foot and hold it in place. It should tuck in between the silicone layer and leather below the straps. The small hole in the tongue should be centred over the front of the ankle. The tongue should be pulled snug without wrinkles.


-

Buckle the middle strap first and make sure it covers the hole in the center of the tongue. The middle strap should fit tight enough so you can only fit a fingernail under the strap.
-

Look through the hole at the back of the boot. The heel should be fully down and back. If not, readjust the tongue and middle strap. You may see a bit of space behind the heel depending on the shape of the foot, but you should not see space under the heel. If you try to tug on the boot, the heel should not move.
-
Once middle strap is done up and heel is in place, buckle the upper strap and the toe strap. These straps can be a little looser and you should be able to fit a finger under the strap.


-
Slide the bar into the boot, one foot at a time. With the bar on, make sure the heel remains down in the boot. To remove the system, push the tab down and slide the bar out. Then remove the boots.


- Your child will likely have some minor swelling in the first few days after the final cast is removed. As the swelling goes down and as the leather stretches out, the strap may need to be tightened to the next hole.
Your baby may be more fussy than usual for the first day. They will get used to the brace. This is a new but normal position for your baby. It is recommended that you leave the brace on for the first 23 hours to allow the baby to accommodate to the new position.
Checking the fit of the orthosis
- After buckling the boots, gently tug down on them. The heel should not slide up or down the boot.
- If the toes slide back in the boot, this is a sign the orthosis is not holding the heel down. Try refitting the boot again. If the problem continues, contact the physical therapist or orthotist.
If the bar becomes loose
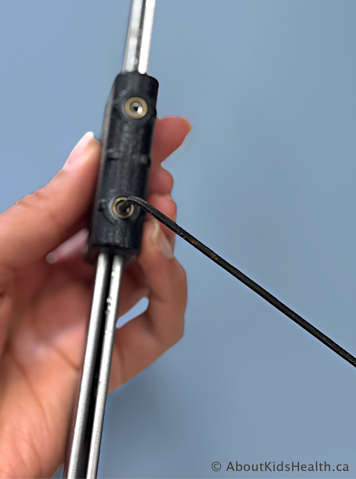
If the length of the bar becomes loose, you can tighten it with a hex wrench (Allen key). The bar length should be set to shoulder width.
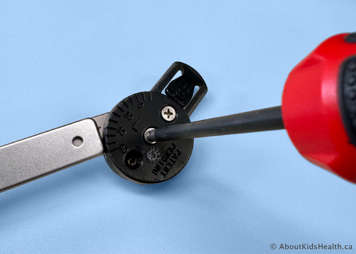
If the top screws loosen, you can tighten it with a screwdriver. If the angles on the bar change and you are unsure what they were set to, contact your physiotherapist.
Other tips
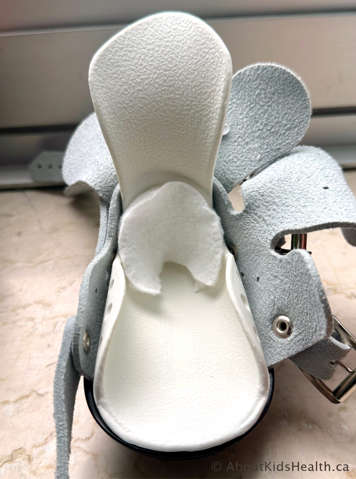
If your child has clubfoot on only one side, we recommend placing a cotton pad in the boot on the unaffected side to offer additional cushioning for the heel as this a common area for a pressure sore to develop.
If you notice the front of the ankle is red and irritated after you remove the boots, you can use a silicone pressure saddle on the middle strap to alleviate pressure. You will have to make the straps 1 to 2 holes looser to accommodate for this saddle – however, the heel should remain well seated in the boot and the middle strap should be tight enough to only fit a fingernail under.
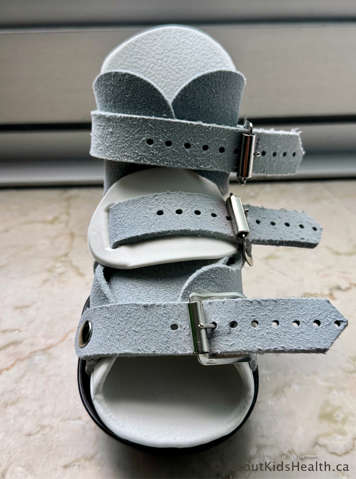
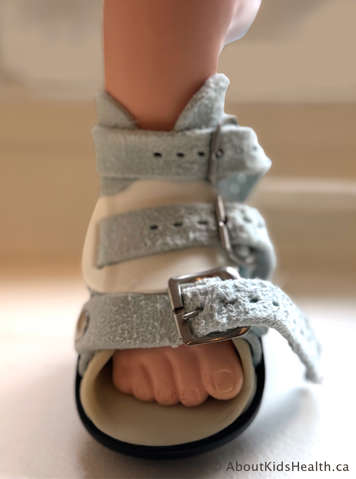
Alternative strap buckling technique
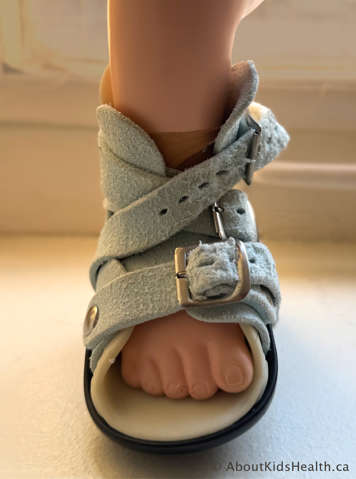
If you're having trouble getting a snug fit with the straps or if the heel is not sitting securely in the boot, try crossing the straps. Loop the middle strap in the top buckle and the top strap in the middle buckle for a more secure fit.
Your child will need to wear the orthosis until they are four to five years old
For the first three months, your child will be required to wear the orthosis for 23 hours each day. You can take off the orthosis for one hour each day to allow for bathing, skin checks, normal touch and play.
After three months, the physiotherapist will reassess your child. The physiotherapist will let you know when your child is ready to wear the orthosis for a shorter time (12 to 15 hours) each night.
Once your child is walking independently, the wear time can be decreased further to 10 to 12 hours per night.
Creating a normal nightly routine of brace wear will make sure your child is comfortable and accepting of their brace. It is important for your child to wear the orthosis every night until they are four to five years of age.
New orthoses will be needed as your child grows.
Your child has outgrown the boots when their longest toe starts to protrude over the end of the boot. If you do not have an appointment scheduled and you suspect the boots are getting small, take pictures and email them to your orthotist who can advise if coming in sooner is necessary.
Skin care
The day after the first fitting, take your child's boots and socks off. After you remove the boots, the skin may be red or pink due to the tightness. This is normal if the red area is spread over a large area of the foot. Small localized dark red areas that do not go away within 20 to 30 minutes may be a sign of a blister or pressure sore.
Pressure sores
- Common areas of pressure sores are at the front of the ankle OR at back of the heel. Please perform a thorough skin check each time the boots are off.
- If any of the following occur, take off the brace and contact the orthotics clinic to make an immediate appointment:
- excessive redness that does not go away in 20 to 30 minutes
- blisters
- bleeding
- skin breakdown
General skincare
Dry skin should be treated with petroleum jelly over all affected areas.
When you start using regular socks, try to use socks that do not have any design so they do not leave imprints on the foot. Also, check that the seam is not causing any pressure on the inside of the foot. If it does, you may need to turn the socks inside out or buy seamless socks. Make sure the sock is long enough to fold the top edge over the boot cuff. This will avoid having the sock slip down in the boot or having the elastic dig into the skin.
Troubleshooting and FAQs
Will my child need special equipment?
No, your child can continue to use their stroller, car seat, infant carrier and high-chair without any special equipment. Your therapist can offer suggestions to make sure your child fits well into the car seat safely with the brace on.
Will my child be uncomfortable in the boots and bar?
Your child may be a bit irritable in the first few days while they get used to the brace, but it should not be uncomfortable or painful. Your child may feel a bit frustrated when they cannot move each leg independently and this can take a few days to get used to.
Move the bar gently up and down so your baby sees how the legs can move and kick together. Push and pull the brace so your child learns how to bend their knees while in the brace.
If you notice that your child is crying more than usual or is difficult to console, check to see if the boots are still fitted correctly and if you need to, remove the boots and check for sore spots or blisters. If a blister does develop, please contact your therapist or orthotist right away.
If my child is uncomfortable, can I remove the bar and only use the boots?
The boots by themselves are not effective in preventing the recurrence of clubfoot. The bar is essential for maintaining the angle required to maintain the corrected position.
How can I prevent blisters?
Proper boot fit is the best way to prevent blisters from developing. The boots should stay on for the first 12 to 23 hours to start “breaking them in”.
If your child seems especially difficult to console before the 12 to 23 hours are up, you can remove the boots sooner and check for red spots or blisters. If there are any areas of concern, you can apply petroleum jelly to the areas and make sure the heel remains in the correct position in the viewing hole.
If there is significant redness on the top of the foot, you can start to use the pressure saddles that were supplied with your boots. You may need to buckle the boot a couple holes looser to accommodate for the thickness of the pressure saddle.
To help prevent heel blisters, it is important to use a cotton pad at the back of the boot (usually needed only on the unaffected side) as a precautionary measure.
How often will my child need to be seen in clinic?
After the boots have been fitted the first time, your child should be seen in the clinic one week later to reassess the fit and check in with you. If your child does not experience any issues, the next follow up will be in 3 months.
Once your child transitions to night-time wear only, their progress will be monitored with follow-up appointments every 3 to 6 months.
What if my child outgrows the boots and bar?
As your child grows, they will need to be fitted for new boots. This will be arranged at your scheduled clinic check ups. If they outgrow the boots before your scheduled appointment, you can contact the orthotics department directly and they can arrange for you to come in sooner.
My child is starting to resist the brace wear, what can I do?
Stay positive! Babies sense your energy, so if you are feeling stressed or negative about the brace, they will feel it too.
Develop a routine such as bath, boots, bottle, bed—babies thrive on consistency.
Make it pleasant by adding something positive, such as singing or a bottle/nursing afterward.
Do not give in. Babies cry and wake in the night for many reasons. It is normal for babies to be a little unsettled in the very first days and nights in their brace, but they will adjust and get used to them. Avoid skipping brace time, as it reinforces resistance.
Older children
It is normal for older children to start to resist the brace at around 2 to 3 years of age. If you establish and maintain a good routine without exceptions, this phase will pass. Do not let your child’s resistance tempt you to “let it go for a night or two”. Removing the brace teaches your child that crying gets results and this will make it more difficult for them to adjust to the brace.
- Make it routine:
Consistency: Incorporate putting on the boots and bar as part of a daily routine (e.g., before bed).
Positive Associations: Link brace-wearing to bedtime stories or a special song to create positive associations. - Personalize the braces:
Decorate them: Let the child choose stickers or colors to make the boots feel special.
Give them a name: Sometimes giving the brace a fun name (like “super boots”, “magic boots”) helps children feel more positive about wearing them. - Use rewards and positive reinforcement:
Sticker charts: Reward every successful night with a sticker and offer a small prize after a week of consistent wear. Celebrate their progress and let them know how proud you are. - Sense of control:
Offer older children choice, so they feel a sense of control (for example, choosing which colour socks to wear, which boot goes on first, or which song to sing while the boots go on). - Distraction techniques:
Bedtime stories or shows: Let them pick a favorite story or short video while putting the brace on.
Comfort objects: A favorite stuffed animal that also “wears boots” can make it feel more normal. - Normalize the experience:
Show stories or videos of other kids who wear braces to reduce feelings of being different.
Involve older siblings: Sometimes seeing an older sibling or role model “help” with the boots can make it more fun.
Read books written about and for kids who wear boots and bar, such as "Let Us Count the Things" (by Catherine Brown), and "Wear Your Boots, Ted" (by Rebecca Jarding), and "My Clever Night-Night Shoes" (by Karen Mara Moss).
At SickKids
Cost of the orthosis
It is 100% covered with Assistance to Children with Severe Disabilities (ACSD), Ontario Works Program (OWP) or Ontario Disability Support Program (ODSP).
The cost of the boots and bar is:
- Mitchell boots and bar: $345.50
- Mitchell boots only: $273.00
- Mitchell boots and bars and pressure saddles: $354.50
Speak to your orthotist for more information on pricing.
References
Ponseti International. Bracing tips. http://www.ponseti.info/bracing-tips.html