At the end of this chapter, you will be able to:
- Understand oxygen saturation monitoring and when to use
- Learn about what is measured
- Identify the components of an oximeter
- Understand power requirements
- Identify how to check the integrity of the cable and probe
What is oxygen saturation?
Oxygen saturation (SpO2) refers to the amount of oxygen in your child’s red blood cells that is attached to hemoglobin.
Normally, red blood cells pick up oxygen as they pass through the lungs. This creates an oxygen saturation of over 95 per cent. However, if your child has a heart or lung condition that prevents red blood cells from picking up oxygen, their oxygen saturation will be lower.
Your child's health-care team will let you know the target oxygen saturation range for your child.
What is an oximeter?
An oximeter is a machine that monitors your child’s oxygen saturation (SpO2) as well as their heart rate.
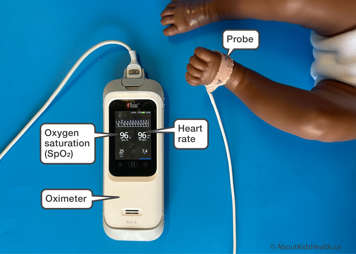
An oximeter can be used at home and when travelling, as most oximeters are portable. The machine has an internal battery and alarms for drops in SpO2 (oxygen) levels and heart rate.
In Ontario, oximeters are funded by the Assistive Devices Program (ADP) for paediatric patients with tracheostomies. Your child’s health-care team will help with the forms required to apply for an oximeter.
What is oximetry?
Oximetry is the measurement of oxygen saturation over time in your child’s blood. Oximetry collects oxygen level data over time to monitor your child’s oxygen levels. The target oxygen saturation levels are prescribed by your child’s health-care team.
Why does my child need an oximeter?
Your child's health-care team might recommend an oximeter to:
- alert you and other caregivers to sudden drops in your child’s SpO2 and/or heart rate
- alert you and other caregivers to potential oxygen or equipment failures
- help them guide treatment and therapy for your child (for example, whether your child can stop oxygen therapy or reduce the amount of oxygen they use)
- monitor response to therapies or changes in therapy
How does an oximeter work?
While in use, the oximeter continuously calculates and gives a reading of your child's oxygen saturation and heart rate.
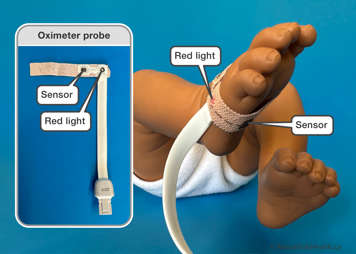
The measurement is taken by placing a probe (a wrap or clip) on your child at a point where a pulse can be detected easily. For babies and younger children, this is usually the foot, hand or toes. For school-aged children, toes and fingers work best. A finger clip probe can be used for spot checks.
The probe has a small red light on one side and a sensor on the other side. The red light shines through your child's finger, toe or side of the foot (babies) and is seen by the sensors on the other side. The sensor then measures the blood's oxygen saturation. The red light is placed on top of the finger or toe or on one side of the foot, with the sensor being placed on the bottom of the finger or toe or on the opposite side of the foot. A sock may be placed over the foot to help secure the probe in place.
Factors that affect the accuracy of the reading:
- excessive motion
- improperly aligned sensor
- incorrect sensor type
- poor pulse quality
- artificial nails
- nail polish
- excessive ambient light
- blood pressure cuff use
- moisture in the sensor
- soiled sensor
Below are the oxygen saturation monitors funded by the Assistive Devices Program and distributed by the Ontario Ventilator Equipment Pool (VEP) Program: Masimo Rad-G and Masimo Rad-8 units.

Masimo RAD-G Oximeter
When you first receive training on your VEP oximeter, you will be provided with the oximeter, a power cord, a cable (to connect the oximeter to the probe), reusable probes and disposable probes. Your child’s health-care team will review these items with you during your training session. They will also let you know how and when to clean, maintain and replace the items.
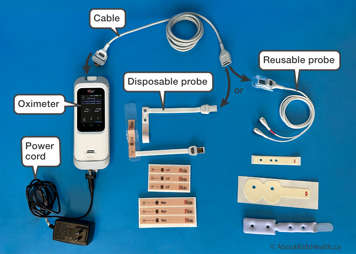
The Ontario VEP Program has information on how to connect the cable to the oximeter and on how to connect the probe to the cable.
Masimo Rad-8 Oximeter
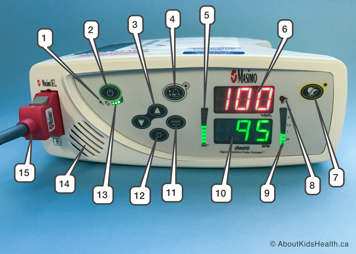
| Rad-8 Oximeter front panel | ||
|---|---|---|
| Number | Control indicator | Description |
| 1 | AC power indicator | Lights up when oximeter is plugged into AC power |
| 2 | Power button | Turns the oximeter on and off |
| 3 | Up/down button | Changes the volume of the pulse tone |
| 4 | Alarm limits button | Changes the alarm limits |
| 5 | Signal IQ/pulse bar | Indicates the quality of the pulse signal |
| 6 | Oxygen saturation display | Displays the oxygen saturation (SpO2) measurement |
| 7 | Alarm silence button | Silences all alarms (for example SpO2, heart rate and low battery alarm) |
| 8 | Alarm light | Flashes to indicate an alarm condition |
| 9 | Perfusion bar | Indicates the quality of perfusion (blood flow around the body); the higher the bar, the better the perfusion |
| 10 | Heart rate display | Displays the heart rate measurement |
| 11 | Enter button | Accesses the setup menu |
| 12 | Brightness button | Changes the level of brightness |
| 13 | Battery charge bar | Indicates the level of battery charge |
| 14 | Speaker | Allows you to hear any alarms |
| 15 | Patient cable connector | Connects to the oximeter sensor |
How do I check the alarm settings on my child’s oximeter?
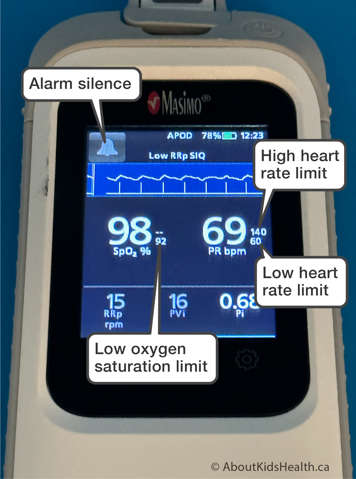
Your child’s health-care team will prescribe and pre-set the alarm’s limits. The limits will be set for:
- Low oxygen saturation (SpO2 %)
- High oxygen saturation (SpO2%)
- Low heart rate (bpm)
- High heart rate (bpm)
Your child’s doctor or nurse practitioner may prescribe a change in the limits as your child grows or if there is a clinic change. You will learn about these limits and how to respond if there is an alarm when you receive training on the device before you take it home.

How long does an oximeter battery last?
The oximeter should be plugged in whenever possible to charge the internal battery. When the internal battery is fully charged, the Masimo Rad-8 oximeter can work for up to seven hours and the Masimo Rad-G works for up to 24 hours. All models are different, however, so please refer to the user manual for your child’s particular machine. Please see label #13 above which shows where to locate the battery indicator for the Rad-8 oximeter. The battery indicator level lights up when the unit is not plugged into AC power. The Rad-G oximeter battery status is located at the top of the screen.
During normal patient monitoring, the battery charge bar will light up green from left to right to indicate the available battery charge when the oximeter is unplugged.